Well, it’s another first on the blog! Today, we’re gonna turn things upside down by taking something reasonably complicated and making it dead simple. Today, I’m going to propose that given the right mindset and procedure, something as lush and seemingly complicated as ice cream can be made in as little as 3o minutes using very few steps and no special equipment at all!
No, really!

Ice cream without an ice cream maker! Preposterous! Or is it?
I’ll be the first to admit that I’m not usually one to take a reasonably complicated dish and actually make it more simple. But there’s a first for everything, and when push comes to shove, even this self-professed food geek and complicator of things will cut a few corners. My push to shove came in the form of a particularly badly timed dinner arrangement. Well, it wasn’t so much a badly timed dinner arrangement as it was a case of the world throwing everything it could at me, seemingly in an effort to stop me cooking for my guests. Guests, who by the way took the shape of a couple of lovely, young ladies, Mette and Ana, I hadn’t seen in ages, well years anyways, and was really looking forward to cooking for!
Now, I’m not one to dislike a challenge, but with this one I did get a little more than I bargained for. I shan’t go into details in this space, but let’s just say that at veritable cacophony of small disasters and straining events along with a heavy work burden rained down upon me in the week leading up to the ordeal… And on top of that, I had to come up with a reunion dinner for people I’d never actually cooked for but who had, in return, spent some time browsing the pages of this blog as well as my Instagram and Facebook feed and were, I dare say, probably expecting me to come up with something a little special.
Want a little added pressure? Did I mention that of the two lovely ladies I’d been tasked to cook for, one is gluten intolerant and another a self-confessed picky eater?
Under Pressure: Ready, set, cook!
Simple, eh? Well, actually, as it turned out, the gluten intolerance wasn’t much of an obstacle, really. Once I establish that bacon, cream and butter were in fact gluten free and spent a little time thinking flour, pasta and beer out of the equation, I had the first major obstacle covered. As for the pickiness? Well, I’ve never actually met a picky eater who did not like bacon, cream and butter – and if I did, I figured, it would probably not be a friendship worth maintaining. 😉
My strategy, thus, soon became clear: cook some good, hearty, reasonably simple comfort food that could be prepared well in advance and easily thrown into something reasonably impressive in a short amount of time while getting tipsy on a bottle of Grand Cru Champagne in the kitchen with the lovely ladies. (Johan, you’re a genius!)

Champagne, like every other aperitif… Only better!
I settled on an easy starter of fully loaded potato skins with sour cream, chili, garlic, cheese, bacon and a completely superfluous side salad. I planned to chase these hearty little nibbles with a gorgeous hunk of Northern Irish Kettle rib eye seared medium-rare and served with Pommes Anna, bacon-wrapped green beans and a red wine/madeira reduction.
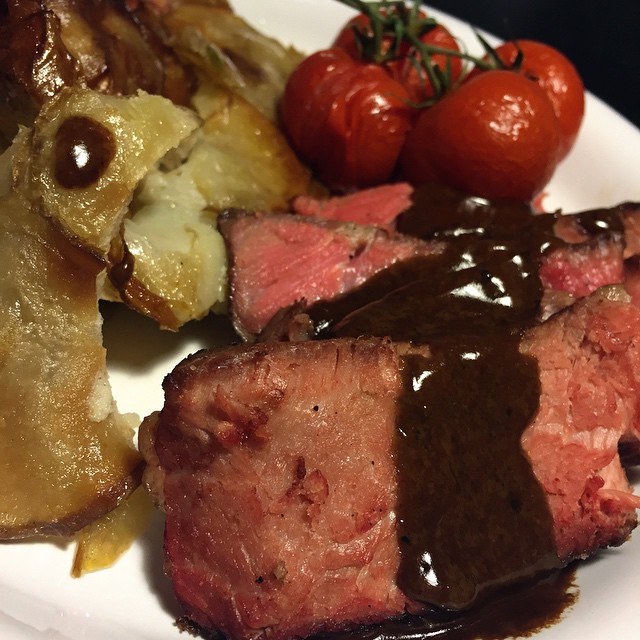
Well, for a rushed main course it wasn’t really too shabby
The beauty of this setup, aside from the sheer amount of butter, cream and cheese involved, was that most of this I could prepare at least a day in advance, leaving me very little to do on the day itself but to get my ass home from work, entertain my guests and pretend that I wasn’t stressed out at all while I finished up dinner and served it up. Simple, snappy, easy!
Of course, with all this out of the way, that leaves only the topic of this particular post: Dessert! And preferably an easy one at that. Well, actually, make that an easy two.
Not really being the sort of person to make things easy for myself, I figured that the company of two girls warranted two desserts, one for each. And most women, I’d think, agree! Not a bad idea as such, it’s just that time wasn’t on my side. Having got the starters and mains prepped, the clock was pushing 10 PM on the night before the big day, and I had to come up with something in the dessert department pretty damn quickly.
Ice cream, the great time saver?
Luckily, for lucky girl no. 1, Mette, the dessert choice was easy. I know of no girl (at least not of a light skinned variety on this side of the Caribbean) who uses the word “Mojito” more in daily conversation than Mette, so the obvious choice for her would be to whip up a quick batch of my apparently now world-famous Mojito sorbet.
Mojito sorbet, seen here on an earlier occasion – all dressed up and ready to go!
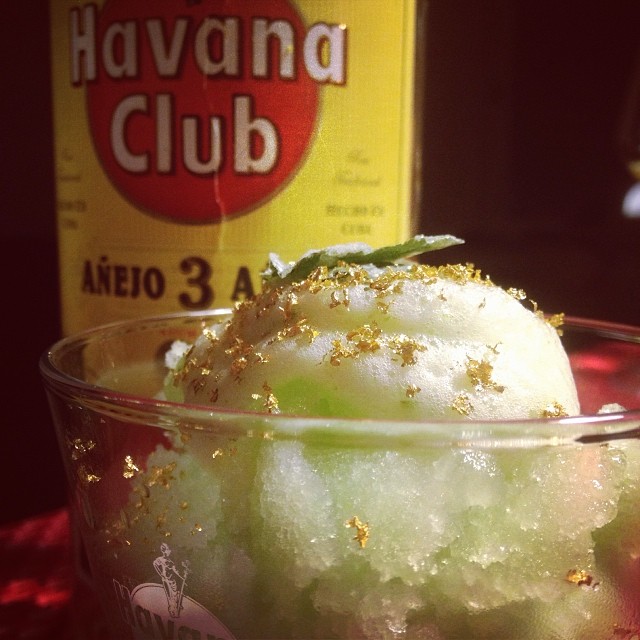
For lucky girl no. 2, Ana, things were a little more complicated and thought-provoking. I knew only that I wanted to do something with Ron Zacapa. After all, she did in a most humorous turn of events unknowingly help inspire me to enter a cocktail content and in doing so creating a <a< span=””> title=”Winter Cocktail: Creamy caramel Zacapa-spiked Mulled Cider” href=”https://johanjohansen.dk/2014/09/29/cocktail-time-creamy-caramel-zacapa-spiked-mulled-cider/”>Zacapa-based drink recipe that eventually ended up taking down this very blog when the end results were shared on Twitter and generated about a hundred hits in just under a minute. The great philosophical question thus became: What do you cook for the Zacapa-loving muse who broke your shit? If not something involving Zacapa? The answer is simple, nothing. You can’t. It’s a Zacapa-based dish or nothing… But what, then?
“I know, I know,” screamed my brain with the most inappropriate of timing on an already frightfully busy day, “… ice cream!” – “Shut up, brain,” I immediately shot back, “I haven’t the time… Or do I?”
Now, I do realize that making ice cream should probably be the last thing on anyone’s mind when they’re somewhat preoccupied working 16 hour days and running out of cooking time. For some reason, though, I couldn’t shake the thought and knew it was the thing to do. It was also a seemingly silly thing to do. I mean, ice cream is difficult, right? It takes time, it takes thought, it takes special techniques, temperature control and special equipment… Right? Well, not so fast, young grasshopper!
While it’s technically true that proper ice cream does take a fair amount of work and some special equipment, (you painstakingly temper eggs, milk and sugar to form what the French call a Crème Anglaise then churn it in an ice cream maker before freezing), I’m here today to prove that you can in fact produce a pretty reasonable approximation of proper ice cream without an ice cream maker – and you can do it in less than half an hour! Freezing time not included, obviously.
Our time-saving solution comes in the form of what the French call a parfait, in which eggs and sugar are beaten separately to form a frothy, sweet egg mixture that is then carefully folded into whipped cream and chilled as quickly as possible. It’s a frightfully simple process that produces amazing results in relatively little time and while I don’t necessarily recommend undergoing this procedure after a 16 hour work day – especially not if this is your first time – it certainly is a great way of creating a special and even seemingly impressive dessert in very few steps.
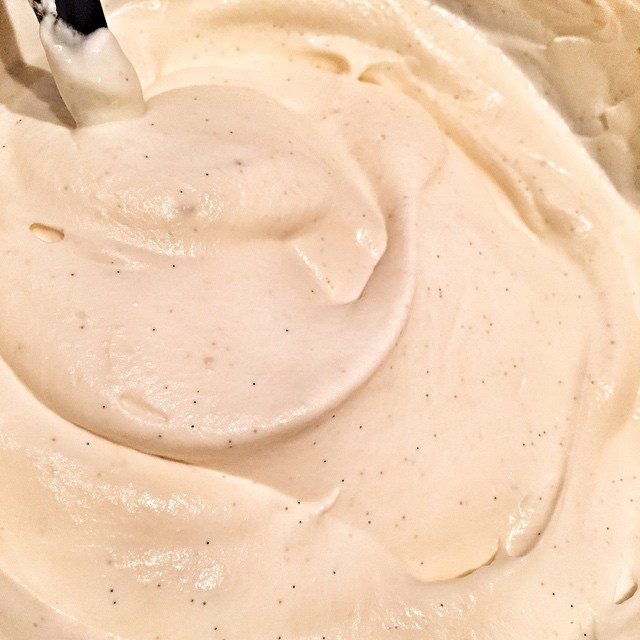
Parfait base. Cream, eggs, sugar and vanilla… It’s beautiful!
Fair bit of warning, though. Because we’re not using an ice cream maker here, the results will be slightly less airy and smooth than a properly prepared ice cream. The process is a lot easier and quicker, though, and once you master the technique, you’ll get pretty damn close to a professional grade product. One that will taste a hell of a lot better and more natural than most anything you’ll find in the freezer section of your local supermarket, I might add.
Even so, here’s your standard disclaimer: While this is not a perfect ice cream, it is at the very least a damn good reasonable approximation of ice cream and at the very best what an utterly biased jury of one has recently described as “the best ice cream ever!”
Zacapa and cream, a match made in heaven!
With this in mind, the ice cream concept became not only more tangible and within reach, it actually became doable and reasonable, even. Lots of flavor and a bit of flash in next to no time using a simple procedure… What’s not to like? And with that, I set out to make ice crem in thirty minutes or less:
The basic recipe for parfait-based ice cream, as outlined in an earlier paragraph, is frighteningly simple. Egg yolks are beaten with sugar and a bit of water-like liquid over moderate heat till airy and fluffy but not scrambled. The resulting mixture is hit with one or more flavorings, then cooled and carefully folded into freshly whipped cream and frozen. Bam!
On that fateful day, my ice cream base started off like any other: with eggs, but from thereon things got a little more creative. I substituted the water in the mix with equal parts of Ron Zacapa 23 year old rum to form the basic flavor profile of my Zacapa-spiked ice cream. I then added the seeds from an organic vanilla pod as an accent, as the exotic floral notes of the vanilla go incredibly well with the sweet and spicy notes of aged rum and the casks in which it was aged.
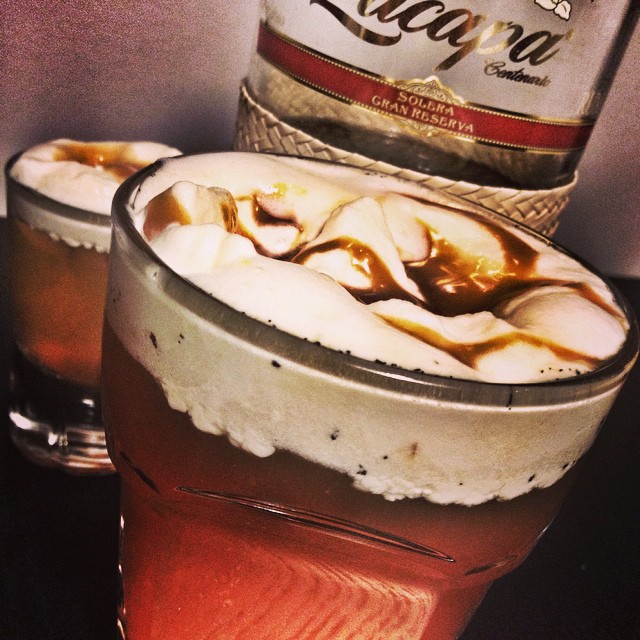
Ron Zacapa, here seen in the cocktail that started it all. The quality of Zacapa may have taken a plunge, but it’s still pretty good in cocktails and desserts!
As for sweetener, white caster sugar is very traditional in ice cream making, but also very… uh… refined. For a little more flavor and character, a good choice would be something a little more natural and unrefined like, say, cane sugar or light brown demerara sugar. You may use brown sugar as well or even syrup, but bear in mind that the darker the sugar, the more brownish a hue it will add to the finished ice cream. I, sticking to my general belief that anything worth doing is worth over-doing, reached for palm sugar. An unrefined sugar made from palm tree sap that is very popular in Thai cuisine. I adore palm sugar for it’s slightly rough and unrefined, lightly toasted and incredible caramel-like sweetness which, again, plays really well with the Zacapa.
I mean, just because we’re in a hurry and are keeping it simple, there’s no need to settle as far as flavor is concerned, right? That’s what I thought anyway when I quickly whipped up some cream and brought together my Zacapa ice cream in what must have been record time, threw it in the freezer, crashed completely after having prepared two frozen desserts in the course of an hour, and pretty quickly fell to my bed, ready to face the jury the next day.
But y’all want a more accurate recipe, right? Well, if I’m perfectly honest, I usually eyeball my parfait ingredients, but fear not. Thinking there might just be a blog post in this effort, I actually took the time to measure things out a bit and jot down a few notes. And with that, I give you my quick and dirty Ron Zacapa and Palm Sugar ice cream recipe:

Quick and easy Ron Zacapa Ice Cream
Ingredients
- 5 egg yolks pasteurized or from a trusted disease-free source
- 120 grams of grated palm sugar can substitute regular sugar
- One quality vanilla pod
- 100 ml of Zacapa 23 Centerinario Rum
- 500 ml of heavy cream
Instructions
-
Split vanilla pod in half lengthwise using a sharp knife and scrape out the seeds.
-
Add vanilla seeds to a small sauce pan along with the rum and sugar.
-
Put sauce pan over medium heat and whisk until sugar is dissolved. Do not let rum/sugar mixture boil.
-
Remove mixture from heat and continue whisking till cool enough that you can stick a (clean) finger in the mixture without getting burned.
-
IMPORTANT: If, like me, you’ve no feelings left in your fingertips, use a thermometer to make sure the temperature is less than 60 degrees. Otherwise the eggs may curdle!
-
Pour in egg yolks and whisk for a few minutes until mixture is light and airy. Set aside to cool further.
-
In a separate, large bowl, beat the cream to a rather firm state.
-
Using a large spoon or spatula, carefully fold the egg mixture little by little into the cream.
-
Start by adding about a fifth of the egg mixture, then carefully fold it in, add another fifth and repeat till done. The goal here is to carefully integrate the mixture evenly into the whipped cream without beating the air out of the whipped cream.
-
Transfer the parfait mixture to a suitable container, cover and freeze overnight or until solid.
-
Remove from freezer about 20-30 minutes prior to serving.
Zacapa ice cream: The verdict?
As I served this recipe up on the following evening to a couple of hungry and excited co-diners at the end of a large meal, two things pretty quickly became evident:
- If you’re cooking for someone for the first time and they’re not used to dining with food bloggers, you probably don’t need to apologize for only having the time and energy to whip up a starter, a borderline perfectly cooked piece of steak and two desserts.
- Zacapa and palm sugar ice cream is a complete, utter and undisputed success!
Let’s just say that the girls were, uh, pleased to put it mildly and that I wasn’t too unhappy with the results myself. The flavors of the Zacapa along with the vanilla and the caramel like sweetness from the palm sugar are what most people would consider a perfect match. And sweet, but not too sweet. Obviously, the parfait base adds a a slightly dense, slightly different texture to the ice cream, but the soft creaminess of the heavy cream as well as the air whipped into it during preparation more or less completely makes up for the slight change in texture.
“This is the best ice cream ever!” – Ana, Zacapa loving, ghost-chili-munching, positively crazy friend of mine.
It also adds an extra couple of calories (one, two, maybe five) but if you’re following this blog, you’re probably not the kind of person to worry about that sort of thing. But if for some reason you are, I’m sure the all-important question beckons by now: can I skip part of the cream for low fat this or that? And no, the answer is no, you can’t! And you shouldn’t! We need the butter fat from the cream to provide texture to the end product, and flavor lest we forget. For once, I must insist that your stop your fat-fearing nonsense and either use real cream or go make something else.
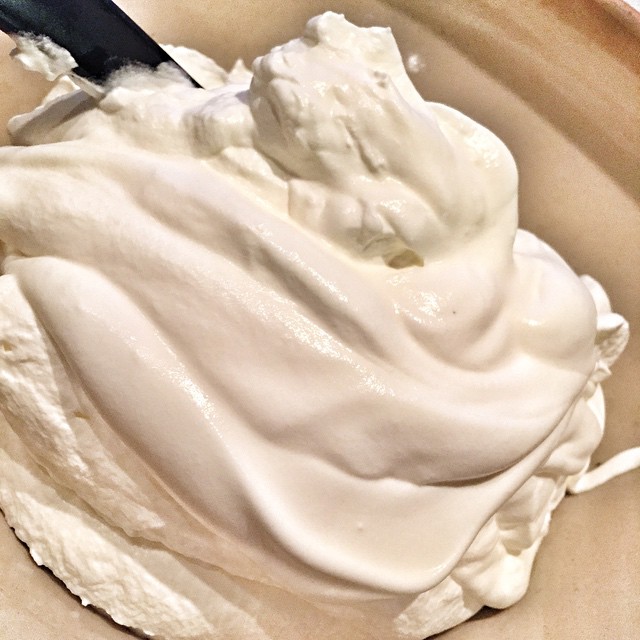
Whipped cream! It’s a thing of beauty!
If you’re going to make ice cream without an ice cream maker, you’ll need the properties that cream provides. If you don’t use cream, the quality of your ice cream will suffer and I don’t want to be the food blogger who told you that you could use skimmed milk and get decent results. I’d really rather be the food blogger who advised you to use real cream and only make ice cream once in a blue moon… And suggest that on those days, you invite some beautiful friends over and really pig out together. On gorgeous, lush ice cream made with real cream…
Because, let’s be honest here, cream is happiness, skimmed milk isn’t. Cream is sexy, skimmed milk isn’t. Cream is texture, skimmed milk isn’t. Oh and speaking of texture, allow me to leave you with a few tips for creating a better texture if you are to attempt this procedure for the first time.
Parfait ice cream: Tips for better texture
While this recipe is not exactly rocket surgery, it does require some thought and consideration and depending on your culinary confidence may seem a little daring. But trust me, it’s really not that difficult and with a little practice you’ll get very far very quickly. And who doesn’t love a bit of practice when the end result of said practice is ice cream?
If you’re one of those people feeling a little uneasy staring at this recipe, here are a few tips and pointers you may want to keep in mind when trying this out for the first time. They just may help you achieve a better texture
Whip as much air into ingredients as possible – because we’ve sworn off the use of an ice cream maker, we won’t have the option of whipping air into our ice cream mixture during the freezing process. This means we’ll have to add as much air as possible before freezing. To do so, mix eggs and sugar mixture vigorously, and don’t be afraid to use an electric mixer here. You’ll want them nice, frothy and airy. The cream, too, needs a good mixing. Again, I’d recommend using an electric mixer here unless you’re a show-off. You’ll want them light, airy and quite firm but stop before you reach the dense, thick state that eventually leads to clog and butter. Once your cream is nice and airy, stop and make sure your eggs have cooled to room temperature to comply with the rule below.
Don’t add hot eggs to cold cream – If you add hot eggs to cold cream, one of two equally bad things may happen. The first would be that the heat from the eggs destroy the airy texture of the cream, making for a thin, runny ice cream mixture. The second would be that the temperature of the ice cream mixture goes up, making it harder to freeze. As far as ice cream making goes, it doesn’t really matter which way of ruining the result you pick, the consequence will be the same: a ruined texture and an abundance of ice crystals in the finished mix. Neither are at all desirable.
Fold together, carefully – So far, so good, so not very difficult. You’ve made sure your ingredients are well airy and that they’re room temperature or not much above. Now comes the only slightly tricky part: the mixing! You must do this carefully! I stress this part not to frighten you, only to make you aware thereof. You must fold, not stir, your ingredients together. Start by carefully pouring about a fifth of your egg mixture into the cream. Then, using a large wooden spoon, spatula or dough scraper carefully dig into the bowl and fold the egg mixture into the cream using large swooping motions. Continue until all of the first addition of eggs is well integrated, then repeat. After 3-4 repetitions, your eggs and cream should be mixed into a thick, homogenous mass that’s now ready for the freezer.
Pour your mixture into a suitable container – something thin and light like a used ice cream container or a loaf pan works pretty well – cover and…
Freeze quickly – Now that everything has come together, we need to go from light and airy to frozen and solid as quickly as possible. I know there are limits here as not a lot of us have access to industrial strength blast chillers. But not to worry, less will certainly do. The only thing that really won’t work are those little frost boxes at the top of the fridge ment for freezing ice cubes and occasionally a Wiener or two (sorry). You’ll need something of a considerable size capable of producing temperatures of -18C or lower, but that really is all. If your freezer has any kind of temperature control, make sure it’s set as low as possible, get your ice cream mixture in there quickly and keep the damn thing closed until you’re reasonable sure your ice cream has frozen solid. That’s it, you’re done. Good boy and/or girl, pat yourself on the shoulder and walk away, now all you have to do is wait… Oh, and one last thing…
Remove your ice cream from the freezer about 20-30 minutes prior to consuming! Because the texture is a little denser than other kinds of ice cream, it might require a little more effort to make pliable and scoopable. Once scoopable feed your guests as much as you possibly can, and then some. The only downside to this recipe is that it doesn’t re-freeze too well – even less so than regular ice cream, actually. But then again, when’s the last time you’ve had guests complain about an extra serving of ice cream? What’s that you say? Never? I thought so!
De-simplifying the simple: Freezer-less ice cream making
Making ice cream without an ice cream maker is all good, but what if the freezer is broken? Well, uh, if for that very reason, or another even more outrageous reason, you should decide to attempt making ice cream without a freezer, check out my previous post on that very subject. What? Yes, of course I have a post on making ice cream without the convenience of a modern day freezer, what kind of a food blogger do you think I am?
Oh right, we were trying to make things less complicated, were we not? Freezer-less ice cream probably isn’t working. Ahem, but, yeah, anyway, last minute side-stepping aside, I hope I’ve shown you that home-made ice cream doesn’t have to be a lengthy process and that it requires neither complicated steps nor special equipment. I hope you’ll give this procedure a spin and maybe come up with your own flavorings and twists… And if you do, please let me know what you wound up with!
Oh, and while we’re at it: what’s YOUR favorite ice cream flavor?