I’m an odd piece of work sometimes. I love food, I love gastronomy, I love a challenge and I love constructing DIY eating experiences from scratch. But there’s one vast area of gastronomy I generally don’t touch upon, one that I don’t dare touch upon. And that’s baking. I tried once, with all the best of intentions. There was an accident. I’ve since then not touched a microwave and my baking efforts have been scarce at best. It’s best not to talk about it.
So yeah, hi, my name is Johan, I’m a do it yourself from scratch food blogger and I don’t bake! Does that make me odd? No, I guess not. But what does make me odd is that when I do, once in a full moon, turn to baking, I do so in the most thoroughly complicated and masochistic of ways. Take my (borderline) world famous pizza crust, for example, it’s a study in patience, hand kneading, waiting and overly complicating matters. It also makes for a very good results – the two or so times a year that I go for homemade pizza. Much the same can be said for my latest baked goods experiment.

Some clever uses for sourdough. I don’t always bake… But when I do, I go all in!
I had invited the girls over for Easter lunch and somehow along the stretch of days leading up to the event, I got to thinking: hey, wouldn’t everything be much better if I baked my own bread for the occasion? A few more days and my brilliant idea had warped into: hey, wouldn’t everything be even better indeed if I made my own sourdough bread for the occasion? “Uh, sure,” the casual reader might reply, “but what’s so great about sourdough?” – well, please allow me, dear reader, to educate you a little! You see, sourdough is not only good eats, it’s a small natural wonder and a huge part of our culinary history.
Definiton: Sourdough, a naturally lightly sour loaf of bread made from a sourdough starter; a mix of flour and water that has been left to ferment to create a naturally sour and extremely yummy natural leveling agent and flavor base for homemade bread.
Before there was yeast, there was sourdough!
The above statement is technically not true, so allow me to elaborate: before there was commercially available yeast, bakers and housemothers alike had to rely entirely on wild yeast. Wild yeast are naturally occurring, dormant yeast cells found in, amongst other things, grain, flour and the likes. Given the right circumstances and the right environment, such as those found in a sourdough starter, a simple mix of water and flour left to ferment, the yeast cells will come to life and act in much the same way as commercially available yeast cells (and many more evolved species) would; that is chow down eagerly on sugars, multiply, belch then topple over.
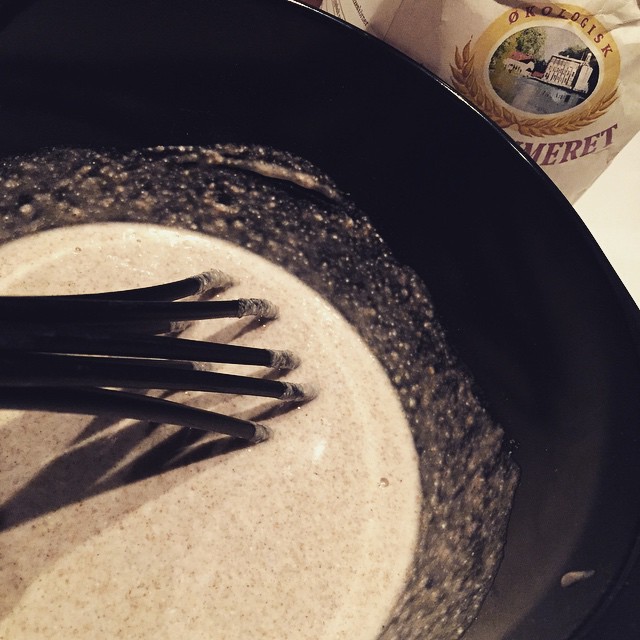
Sourdough, day one: Bringing the starter together
This process, unappealing as it may seem, is what makes bread rise whether commercial yeast or wild yeast is to blame for the magic. In the days of yore, bakers had no choice but to go the sourdough way, create a so-callled starter culture and let the yeast cells slowly evolve. Today, we have choices of commercial yeast or the classic wild yeast way. Only, if we’re to go the wild yeast way, we’re gonna need a few extra days (to the tune of 3-4 days, that is) and a lot more work to produce bread. So why bother when, in this day and age, we can just drop by the supermarket and make our choice between different kinds of commercially available yeasts? Or several ready-baked loaves of bread for that matter? The answer, my friends, is flavor! And if you’re a geek like me, the added “I can do science, me!” factor.
Wild yeast and the science of sourdough
So, just how would one go about creating a sourdough starter? Well, wild yeast cells need very little to get going. As a matter of fact, they need three things: water, flour and time. Mix the three ingredients in the proper proportions to create what is known as a sourdough starter and soon enough, usually in a matter of three to four days, you’ll have yeast. Add a few more ingredients plus another day or so, and you’ll have some honest to God great tasting bread.
What happens, in simplified terms, when flour comes into contact with water is that naturally occurring amylase enzymes will start to break down starch into maltose, the maltose in turn is broken down into glucose by another enzyme known as maltase. Given enough time and proper temperature, the glucose will become fodder for various wild yeast and bacterial cells that are naturally present in flour. The yeast will start to metabolize the glucose and whichever parts they can’t handle will be taken care off by various lactic bacteria developing alongside the yeast and eventually working in symbiosis with said yeast. Whatever the yeast can’t handle, the bacteria chomps down into manageable pieces that then in turn become fodder for the yeast. The byproduct of this entire process, as with any other yeast dough, is carbon monoxide.
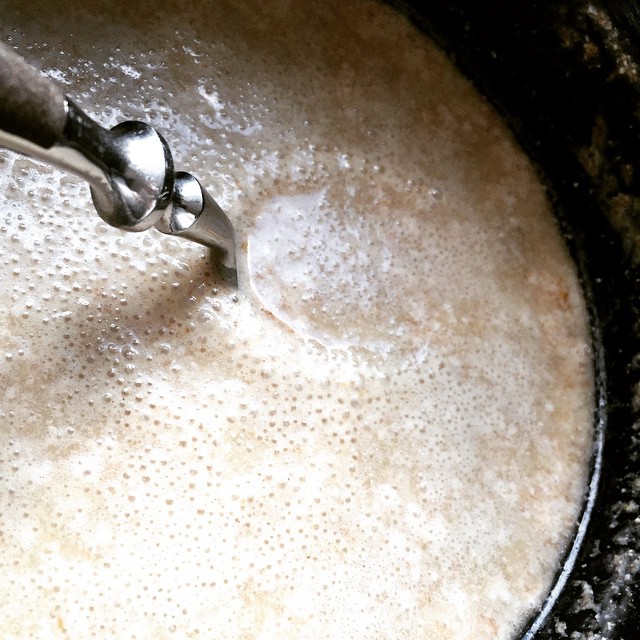
Sourdough, day three: In the immortal words of Victor Frankenstein – It’s alive!
This altogether complicated process is what eventually gives sourdough it’s levening powers and its characteristic lightly sour taste. Indeed, who’d have thunk that bacteria were to blame for the unique twang of sourdough? It’s one of nature’s little miracles!
Making your own sourdough starter at home
Now, I know what you’re thinking: that all seems horribly complicated. And by God it is. But here’s the beautiful aspect of sourdough, we don’t really need to worry about processes, we can let Mother Nature do all the hard work and thinking for us. Basically, the only skill you need to be in possession of in order to produce a sourdough starter is the ability to mix equal parts flour and water and stir it regularly for a few days. That’s it. Promise! If that sounds too complicated, most stores will sell sourdough starters or sourdough boosters. But really, that’s cheating and cheating is no fun. Hence, we’re gonna do things the from scratch way in this post.
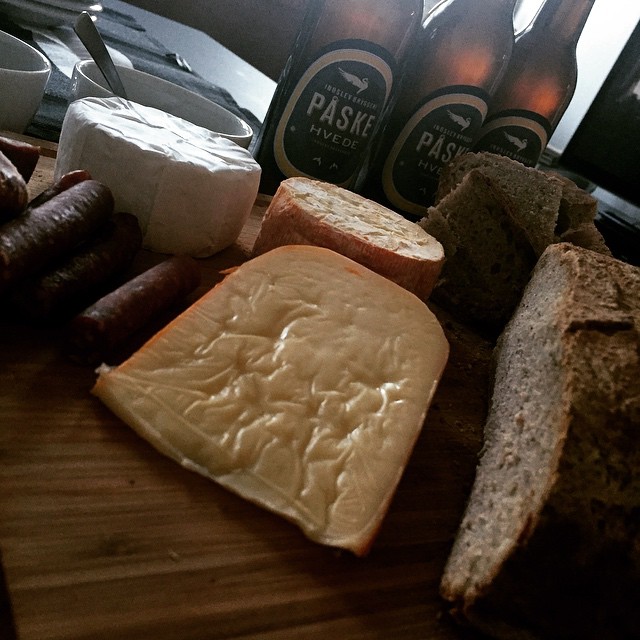
What’s better than than cheese, beer and a bite of bread? Cheese, beer and homemade bread!
But again, why bother? The fact aside that you get to appear either super cool, geeky and/or strange to your friends as you’re now the dude or chick who bakes his/her own bread from scratch, there are a few even more appealing aspects of making your own sourdough:
- It’s a genuinely rewarding experience to have made your own (tasty) bread entirely from scratch.
- The flavor of homemade sourdough is absolutely superior in any way to your average slice of white bread – and most commercially produced sourdough loafs, too. Once you get your starter up and running, you’ll be able to produce sourdough that’s cheaper, more natural and better than commercially available alternatives. This is probably the sole best reason for going through the hardships of creating and maintaining a sourdough starter.
- If you’re going to be making rye bread, you pretty much need sourdough as commercial yeast will not produce the same results in baking.
- A sourdough needs maintenance and care. You need to feed it regularly and stir it, less it spins out of control and eventually dies. It’s basically a living organism. You can give it a name and treat it like a pet. It’s sort of like a dog that doesn’t need a walk or a cat that doesn’t scratch you.
And, uh, you probably should shy away from reason no. 4. Your friends will think you’re pretty weird… Or so I’ve heard… With that said, though, both options 1 and 2 are perfectly valid reasons for starting a sourdough at home. And who knows, you may just grow addicted to homemade sourdough. It really is surprisingly superior to most store-bought alternatives!
With the reasoning covered, let’s have a look at just how easy it is to get your own sourdough starter up and kicking at home.
A short note on types of sourdough…
Before we begin, let’s take a few paragraphs to set a few things straight. You may not be aware of this, but there are many distinct types of sourdough starters. Some are wet, some are dry. Some add a lot of flavor, some are more subtle. Some are bubbling with life, others add very little leveling power of their own.
We won’t go into details here, but a pretty good overview is available from our dear, old friend Wikipedia. The sourdough that I favor is of the old Danish tradition, meaning a wet starter that takes very little effort to get started, yet offers a lot of flavor and twang – but not too much in terms of leveling power. Basically what this means is that once we get around to baking with our sourdough, we’ll need to add a tiny bit of yeast to get the nice and airy results that we desire in the final loaf. The little extra step at the end of the process is easily justified by how easy this starter is to get going and the awesome flavor that develops throughout the simple, laid back process. But enough talk, let’s go create a bacterial haven:

Homemade Sourdough Starter
Ingredients
- 3 dl water use filtered water if your tap water contains noticeable amounts of chlorine!
- 1 dl wheat flour
- 1 dl wholegrain flour
- 1 dl rye flour
Instructions
-
In a large bowl or other suitable container thoroughly whisk together all ingredients until a uniform lumpless texture is achieved.
-
Loosely cover the bowl with a lid, splatter guard, towel or similar and leave to stand on the kitchen counter for 3-4 days. You'll want air to be able to get to the dough, but you also want to keep bugs, large particles and other nasty things out.
-
Over the course of the coming days, whisk the sourdough thoroughly through a couple of times a day. Don't be surprised if you see bubbles breaking the surface and start smelling a lightly sour bready aroma. That's yeast and bacteria at work. And good signs indeed.
-
After 3-4 days (sourdough takes longer to get started in the winter), your dough should be nicely bubbly, have a yeasty aroma and be nicely sour. Go on, give it a taste, it won't hurt you.
-
If all is well, you're ready to bake. If not, give it another day or so. Patience will set you free.
Recipe Notes
Don't panic if (when) parts of the flour sink to the bottom of the bowl during the process, give it stir to recombine and all will be well. This is perfectly normal behaviour for a sourdough, the same goes for the funky aroma and the bubbles.
And that, as they say, is that. Congratulation, you’re the proud parent of a sourdough starter. By the end of the line, you’ll probably be looking at the bastard child you’ve created, thinking it’s looking a bit odd, possibly a little scary, and you may well be wondering just what the hell to do with it. The obvious answer, of course, is to scoop out a portion of the starter and bake with it and we’ll get right along to that – in our next post. But there’s much more to sourdough than just cooking. For starters, let’s talk a bit about the essence of what we’ve created, how to deal with it without panicking, and exactly how to keep it alive and kicking in the weeks, months or years to come. Keep it alive, he said? Well, a sourdough like any living thing needs a little bit of tender, loving care every now and then. Treat it well and it will treat you well.
Feeding and maintenance: Zen and the art of Sourdough
A sourdough, essentially is a living thing. Well, technically, it’s not a living thing. It’s a symbiosis of a plethora of living things, working together in perfect harmony. A culture if you will. And a culture that will adjust to the environment in which it lives. In that way, no two sourdough cultures are entirely alike in composition, sourness and flavor. This is why there are such things as the famous (and infamous) San Francisco sourdough and why iconic bakers around the world are naturally proud of their sourdough cultures, some of which are hundreds of years old.
Let’s, for the sake of simplicity, though, say that a sourdough is a living organism and as with any other living organism, it needs nutrition every so often for the organism to stay healthy and keep it’s magical powers intact. Luckily, once you’ve got it fired up and kicking, maintaining and taking care of a sourdough isn’t much of a big deal. All it needs is regular feedings and a loving stir every now and then. On the other hand, if you don’t feed your sourdough starter, the yeast cells will eventually run out of nutrition and die off, leaving a once beautiful symbiosis between wild yeast and tasty bacterial friends oddly one-sided and off. The sad, eventual end result is the death of our sourdough and we don’t want that, so regular feedings (as with any other pet) is in order.
To feed, or refresh, your sourdough, all you need to do is to simply grab a portion of your existing sourdough starter, often the part that is left after a baking session, mix it with some fresh water and flour and stir it well together. The ratio we will apply when working with sourdough starter similar to the one mentioned above is one part sourdough to two parts water and two parts flour. Mix everything well and thoroughly with a whisk till any lumps are gone your sourdough starter will relatively quickly start digesting the new, fresh starch molecules and reward you with renewed leveling activity and more great flavor in the days to come. Experts will let you know that sourdough is ideal for baking 8 – 24 hours after a refreshing, but it will be just as good after a day or three, just notably more sour.
Basic recipe for a well-fed sourdough: Mix 1 dl of sourdough starter with 2 dl of water, 1 dl of wheat flour and 1 dl of wholegrain flour. Mix well until smooth and lumpless, then leave to stand for 8 – 24 hours before using.
Bear in mind that we’re using a ratio of four parts new to one part old when feeding our sourdough. This means if you want the same amount of sourdough after feeding as before feeding your dough, you’ll have to either spend all but 1/5 of the original starter for baking between feedings or you’ll have to discard parts of the old dough. Keep this in mind at all times or your sourdough will grow exponentially out of control. Simple and logical as this seems, a common beginner’s mistake is to suddenly end up with a hell of a lot more sourdough than needed.
Why keep the starter alive when you can just start over? This question was posed to me by my wonderful editor, reviewer and proof-reader Tina during her review of this post. The answer, my dear Tina, is two-fold: For starters, if you keep it alive, you’ll always have sourdough to cook with and won’t have to wait 3-4 days when you want homemade bread. Secondly, a sourdough starter is a unique, living thing. Two starters will never taste exactly the same. If you’ve managed to produce one you’re really happy with. Why start over at the risk of it not being as good?
How often, then, should you feed your sourdough? Well, it sort of depends. If you keep your dough at room temperature as most of us do, I would not suggest going more than 2-3 days between feedings if you want to keep things in perfect condition, 4-5 would be okay, anything more and things get a little risky. The longer you go between feedings, the more, well, sour your sourdough will get and the more funky the results. If you’re into really sour bread, and some of us are, great fun can be had in finding the right time to cook with your dough for that perfect sour twang. Know, though, that there will be some trial and error involved and some perils: If you go too long between feedings, the microbial environment in your dough will eventually turn hostile and the yeast will start to die off all while funky flavors star to develop.
Leaving home? Put your sourdough in suspended animation! Not all of us have the time to bake every couple of days. And some of us do occasionally leave our home for more than a few days at at time. If you want your sourdough to last more than 2-3 days without food, simply put it in the fridge. The cold will slow down the yeast and other microorganisms and your sourdough should be able to go for about two weeks without food or TLC. Once you’re ready to resume your sourdough duties, remove it from the fridge, put it back on the kitchen counter, feed it as described above and wait for 2-3 days. Your sourdough should now be as good as new!
So unless you really know what you’re doing or don’t mind having to start over, keep your sourdough starter well-fed and happy with feedings at least every 4-5 days, stir it once or twice a day and you’ll have very little to worry about other than which types of delicious bread to bake and consume. No, seriously. I know a sourdough starter may seem like a pretty odd and unusual pet, and I do realize that taking care of it may seem complicated and risky, but really, very few things can go wrong as long as you keep your eyes peeled and treat it well.
On sourdough and food safety… Need I be scared?
Over the last few decades there has been a lot of focus on food preparation, contamination, storage and refrigeration. With good reason, I might add! Food borne illness is no joke and nothing to take lightly. However, given this at times near panicky-like focus on food safety and proper storage, it makes sense to wonder if traditional sourdough is really such a great idea. I mean, honestly, leaving something at room temperature for days to be infected by wild yeast and bacteria for the sake of subsequent human consumption. It does sound a little counterintuitive, does it not? And is it even safe in this day and age?

Granted, sourdough is a bit of work. While waiting for your sourdough starter to come alive, why not have a drink and update your blog?
Putting it briefly. Well, yes. On all levels! If we are to look first at the issue of refrigeration, let’s look to history for our voice of reason. People have been making sourdough bread for hundreds of years. Proper refrigeration has been around for a hundred or so of those years. It’s probably safe to assume that we can make do without refrigeration of our sourdough starter. Scholars within the field of debating will tell you that this is not a valid argument. Well, uh, I’v never heard of anyone dying from consuming unrefrigerated sourdough. How’s that?
As for the intentional contamination of the starter with yeast and bacteria, I’ll grant you that this all does sound a little iffy – bacteria have done pretty bad things to mankind over the course of history, mind you. Also bear in mind, though, that there are good bacteria and bad bacteria, and that they usually exist in decidedly different environments. Where one kind thrives, the other usually dies. A colony of bacteria, much like humans ironically enough, will work to create an environment that is beneficial to their own kind but not necessarily to outsiders or other species. The true beauty of sourdough, as it turns out, is that in creating the beneficial microbial environment that gives sourdough its power and unique taste, the good bacteria that we love to snack on actually create an environment that’s incredibly hostile to bad bacteria that would be harmful to our bodies if consumed. It’s microbial magic and a wonderful thing indeed!
And yes, I realize that this might well be a little hard to believe, especially when your starter turns active and starts really bubbling away on the kitchen counter. Odd as this behaviour might seem, it is, however, perfectly normal and desirable behavior for a sourdough. So believe me when I say that you’re just gonna have trust in me, in culinary history and in your own judgement. People have been baking bread for centuries, with great and tasty results. With just a little leap of fate and a healthy dose of common sense, you, too, can wow your friends with amazing and perfectly safe-for-consumption homemade bread.
All of that being said, we’re dealing with a natural product here and things CAN occasionally go wrong. Want to know what real signs of impending doom to look out for when tending to your sourdough starter? Fear not, your buddy Johan has you covered!
Sourdough gone awry? Things to watch for!
Looking for things that could possibly go wrong? One very obvious sign of things starting to go awry in your sourdough starter would be sudden growths of mold or fungus on the surface of the starter. A little bit of mold on the dried pieces of dough on the side of the container that holds your starter is probably nothing to worry about. You could probably just transfer the dough to another container and be home safe. If mold starts developing on the surface of the starter itself, it’s time to trash it and move on, though. Some will tell you otherwise. That you could just scrape any small bits of mold or dislocations off and keep going. Follow this advice at your own risk, though.
Another thing to watch closely is the aroma of your sourdough. It’s a pretty good indicator of the health of your starter. A well-developed, healthy sourdough starter should have a pungent, funky and kind of sour smell to it. It should remind you of a punk rock mix of bread, yeast or stale beer. As long as this is the case, all is well, even if the smell seems at first stronger than you might think it would be. If, on the other hand, you start getting an extremely funky and/or rotten notes, things are most certainly not well and you should dump your starter and start over. We are dealing with a natural product here, after all, a spontaneously fermented natural product acting as breeding ground for millions of microbial organisms, that is. Most of these are as we have already established friendly, but occasionally, the odd bad guy WILL try to crash the party. When in doubt, throw it out. And start over. This, too, is part of the charm of working with a sourdough culture.
Disaster management: Sourdough insurance! Things can, and more than likely will, go wrong. If you’re worried about losing a really tasty sourdough starter and a lot of hard work, put your mind at ease by taking out a bit of insurance. Grab a bit of your starter and smear it in a thin layer on a piece of parchment paper. Leave it to dry out at room temperature, then scrape the dried dough into an airtight container or plastic ziplock bag. This way, if something happens to your stater, you can easily start a new by combining flour and water as above, then adding a bit of your dried starter as a booster.
Want to get baking? The possibilities are endless…
So, I guess by now you’re either getting really excited about the prospect of homemade bread or getting really tired about hearing about sourdough and wild yeast. If the former is the case, fear not, good things are in store!
The starter that we have just created is a versatile one that will lend itself well to both light loaves, wholegrain loaves and decidedly dark loaves of bread such as the Danish classic rugbrød or rye bread. In the coming days or weeks, we’ll cover a few uses for your new best friend, the sourdough starter. For now, sit back, relax and wait for your sourdough to get kicking. Check back soon and I’ll have a real rarity for you: a recipe for homemade bread developed and tested by Johan. Yes, the Johan baked. And it was good!
Nice read! A little note: Whenever I feed my sourdough I always put it in a clean container to make sure that there are no sourdough leftovers sitting on the edge of the container to rotten.
Thank you, Martin! 🙂 And a very fine point that is. I don’t always do so myself, but I do it from time to time to avoid mold or rot. I’ll update the article to reflect this.