It should come as no surprise by now to regular readers that I like to experiment in my cooking. Hardly anything I do ever comes out the exact same way twice which is another reason I started adding recipes and procedures to this blog. At least that way, if something turns out right, I can go back, check my notes and find out exactly what worked and what should maybe be improved upon.
One dish that I particularly like to experiment with is the quintessential campfire classic of the American prairie: Chili Con Carne! I must have cooked the dish at least a dozen or so times a year over the last ten odd years, possibly making this my most cooked dish alongside Bolognese. Over the years, I’ve tried and tested a ton of different ingredients and a ton of different procedures: some for the worse, some for the better, some just plain weird!

Chili Con Carne – another favorite obsession of mine!
In short: I’ve come to pretty good grips with the iconic dish that is Chili Con Carne and I’ve done a lot of experiments so you, dear reader, don’t have to! Wait… I’ve done a lot of experiments so that you may feel comfortable experimenting on! Through years of trial and error, I’ve discovered what I believe to be a pretty great basic recipe for a basic Chili Con Carne, and what I now propose to do with this post is give you a bit of history on the dish, a few tips and pointers for making a great Chili Con Carne at home, offer my take on the bean controversy and, finally, offer you a recipe for my Basic Chili Con Carne for you to experiment on with.
Want a leaner, healthier, less complicated alternative? Why not check out my Fire-roasted turkey chili with a fruity Ghost Pepper kick? It’s said to make even seasoned American chili makers jealous.
First things first… A brief history of Chili Con Carne
Every kid knows that Chili Con Carne, or simply Chili, in its purest form is a spicy stew containing chili peppers, tomatoes, meat (commonly beef), tomatoes and (sometimes) beans. But that’s about all every self-proclaimed expert can agree on. Well, it’s also widely agreed that common seasonings include garlic, onions and cumin, but from then on onwards, there are about as many recipes and opinions about chili as there are chili cooks… And there have been a lot of chili cooks over the years!
Some of the first chili cooks were American frontier settlers who cooked a version of chili consisting of dried beef, suet (aka beef fat), dried chili peppers and salt which they pounded together and supposedly enjoyed. A rather humble beginning for such an iconic dish, wouldn’t you say?
From the 1890’s and onwards the dish was, thank heaven for today’s chili aficionados, improved and elaborated on by so-called “Chili Queens”, brightly dressed Mexican-American women who sold reheated batches of Chili Con Carne as streetfood in San Antonio, Texas. A lucrative business that probably helps explain why most people believe Chili Con Carne to be of Mexican origin, and one that went on until the late 1930’s when new sanitary rules put an end to this tradition.
Almost overnight, Chili Queens gave way to Chili Parlors, much more established, well, establishments that continued to fulfill the public demand for the fiery food – and the rest, as they say is history. Chili Con Carne not only became the official state dish of Texas in 1977, but has also moved on to gain international acceptance and recognition. Today, Chili is a global favorite and probably THE favorite food for cook-offs around the world, beating BBQ by a noticeable margin. So how, pray tell, does one go about cooking it? Patience, young grasshopper, first one must know the basics!
Chili 101: Chili Con Carne Basics
A proper Chili Con Carne is a pot labor of love, or in our case a multi-pot labor of love. Something that is at one time incredibly simple, and incredibly complex. A true juxtaposition if you will. Hah, I’ve always wanted to work that word into a sentence!

Chili Con Carne basics: Serve your Chili with PLENTY of Coronas!
Chili is also one of the original slow foods consisting of tough cuts of meat, aromatic vegetables, tomatoes and pungent spices left to simmer in a pot over a low flame for next to forever until a rich, thick, slightly sticky, hot, roasted, aromatic, spicy, flavorful mess is produced by the end of the day. A lovely mess which clearly expresses every single note of every ingredient put in, amplified by the hours of time that went into cooking. This, my friends, is exactly how a Chili should be, and, following years of trial and error, I have now finally compiled a list of tips, tricks and a basic recipe that helps my Chili turn out exactly that way every damn time. It’s been a hell of a ride, but also a lot of fun.
The good news is that Chili is actually not a difficult or complicated dish as such, it just needs a bit of time, patience and some amount of tasting and adjusting on your part near the end of cooking. Chili requires very little actual cooking, but quite a lot of waiting around and can lead to some extend of being driven crazy by intoxicating smells.
Aside from the ingredients, which I’m soon to reveal, I have but a few basic rules for Chili Con Carne perfection to offer… Well, that and a few secret tips and tricks, of course, that help boost the flavor profile and aromatic depth of the dish. But first, the rules!
The few, but important, cardinal rules of Chili Con Carne making
Rule no. 1 of Chili: A proper Chili takes all day!
Nothing more, nothing less. Unless you own a pressure cooker, that is, in which case it’s perfectly okay to cheat. If you don’t, expect to be spending a good six hours or more on your pot of chili. Very little of this time requires any effort on your part, mind you, but your chili will need a lot of time over low heat for everything to cook up nicely and for the flavors to mingle properly. Believe me, though, your patience will be rewarded!
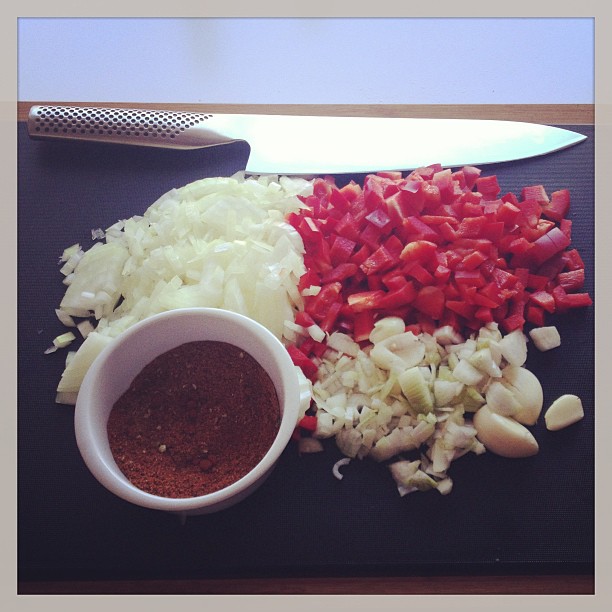
A couple of basic ingredients for Chili Con Carne.
Rule no. 2 of Chili: Your Chili is a work of love, feed her well!
If we are to spend an entire day of our busy, little lives wringing as much flavor and character out of our ingredients as we possibly can, it only makes sense that we get the best possible ingredients. For vegetables, go with the fresh, local, possibly organic kind. For your meat, go with something nice and flavorful from the butcher, preferably something that lived well and had a happy life. Spend a little extra, your investment will be rewarded. For canned tomatoes, beans and everything else, don’t buy the overly expensive fancy name-brand from the top shelf, but do pick a nicely priced, quality brand that you know and trust. Every store and supermarket has one, and you’ve already done your research, right? No? Well, go ask someone who did!
My point here is, don’t necessarily overpay for ingredients, but put some effort into finding the best possible ingredients for the job. We’re gonna put a lot of time and effort into this, we may as well have the best possible starting point.
Rule no. 3 of Chili: Say no to ground beef!
For Chili I never use pre-ground beef, and neither should you. Get a nice big hunk of cow and cut it up yourself, either before or after cooking. Not only will it save you a lot of money, it will also hold up better to the lengthy cooking and provide more flavor and a much better final texture. Cuts to look for for Chili would come from the front or the back of the animal. One of my most memorable chilies of all time was made using ox tails, but something much cheaper but equally tough will do: brisket, round or my old favorite chuck all make wonderful Chili cuts if given enough time. I’ve heard good things about beef short rib as well, but I have yet to test and confirm.
If you must use pre-ground beef, go to your local butcher on the day of cooking, look him in the eyes and ask him to freshly grind some for you. And please ask him to make it a fatty cut and grind it as coarsely as possible. We don’t want a total mush here, we want texture and noticeable beef chunks that will stand up well to prolonged cooking.
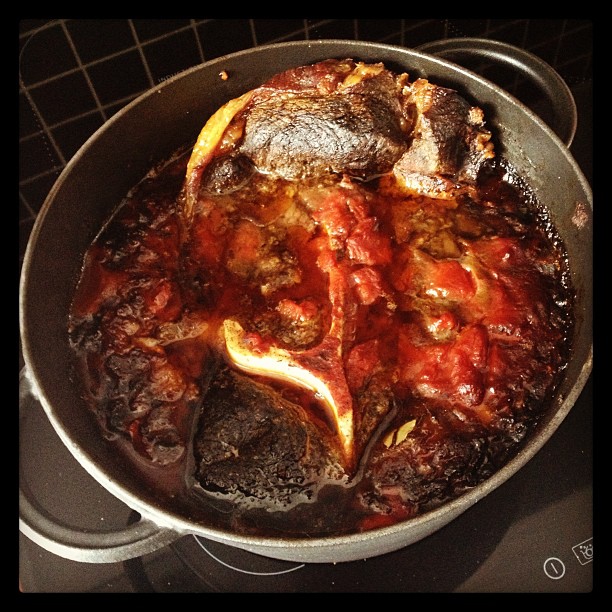
Slow-braised, bone-in chuck roast, a perfect foundation for Chili Con Carne!
What I’ve actually done lately is to go through the extra trouble of taking a huge chunk of meat – like this weekend’s beautiful bone-in chuck roast courtesy of my friend Malene’s aunt – sear it well, and start it off pot roast style along with vegetation and spices. Then, after hours of cooking, cut it up and mix it with the rest of the ingredients as well as the cooking liquid to make the final Chili Con Carne. It’s an extra step, sure, but it’s well worth it as we shall soon see.
Rule no. 4 of Chili: Some things are meant for searing, others are meant for sweating
This is a concept, I introduced in an earlier stew post, so I’ll make it quick here: When I cook stews or other slow food dishes, I like to subject my ingredients to different treatments. Some, like beef and onions, I usually sear relatively quickly over high heat to achieve caramelization, color and roasted flavors. Others, mainly the aromatic vegetables, I sweat very gently and slowly over low heat to bring out their natural sweetness, aromatic flavors and smells. When mixed, the final result becomes greater than the sum of its parts. It’s an extra step or two, granted, but it does make a world of difference. You can skip this step for spend and comfort and just brown all your vegetables together for a few minutes, but you’ll sacrifice a lot of flavor in the process. Whatever you do, though, make sure you at least sear your beef thoroughly, please!
So, are those the only rules of Chili Con Carne making? No, probably not, but I like to experiment so I like as little as possible to be set in stone. Therefore, these rules, along with some dirty tips and tricks, make up the cornerstones of my Chili Con Carne cooking. Other variables vary wildly from time to time. Now, before we do any cooking, let’s lastly have a look at some of the secrets I’ve stolen borrowed from the Chili Masters during my 10+ years of research.
Top Chili Con Carne Secrets
Right, ready for the good stuff? Alright, so, secrets may be a bit of a big word. What’s listed below aren’t really big secrets, they’re more like a collection of more or less widely known tips and tricks for a more flavorful Chili Con Carne that I have harvested over the years and have confirmed to work through the wonderful process that is trial and error.
Secrets or no secrets, read on, though, and discover some of my personal favorite Chili Con Carne tricks:
If you want to think Chili, first you must think pot roast: Okay, so, this is not really a secret as it was covered in the beginning of this post. And it may even sound a little silly, but the truth is that I have long ago found out that ground beef is not the way to go when cooking Chili. Rather, I use larger cuts of meat and do the cutting and cubing myself. It makes for a much bette result, I feel. For my most recent, and most successful experiments, I have actually gotten hold of large, bone-in chunks of meat and cooked them low and slow pot roast style with spices and a bit of liquid for upwards of 5 hours before dicing them up and mixing them with the rest of the ingredients. It’s a bit of extra work and effort, but it’s worth every minute of your time, trust me on this one!
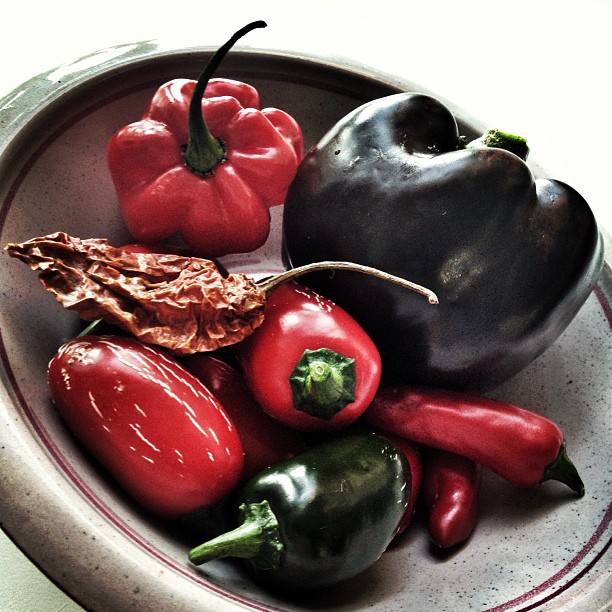
They don’t call it Chili con Carne for nothing: Any decent Chili Con Carne needs a fair amount of chilies in it. I’m sorry, but that’s the law. That’s not the same as to say it needs to be scorching hot, though. Thankfully for the not so brave home chef, chilies come in a variety of shapes, sizes, tastes and heat levels. That’s what makes them so fascinating. Most Chili cooks make their Chili with a wide assortment of chilies, both mild and hot, fresh or dried. The composition varies widely, and you can use whatever you like, maybe even experiment around a little. Finding your favorite Chili blend takes some time, but it’s all part of the game – and great fun. Chilies that I, myself, find mandatory in a Chili Con Carne include:
They don’t call it Chili Con Carne for nothing!
- Red bell pepper: Not technically a chili, but still, I use fresh red bell pepper to add fruitiness and sweetness to my Chili Con Carne.
- Ancho: A large, very mild and extremely aromatic chili that forms the base of most modern Chili Con Carne. These are readily available in dried form and I use quite a lot in my standard mix.
- Jalapeño: a medium hot, fruity little devil generally held as one of the most popular and tastiest chilies in the world. It’s also one of the only chilies that is usually eaten in it’s unripe, green state. I prefer them red, ripe and hot, though. And I like them fresh.
- Chipotle: Chipotle are actually nothing but red, ripe Jalapeños that have been dried over smoke for an extended period of time. They’re available either whole, as a powder or reconstituted and canned in a fiery, vinegary solution called adobo sauce. If you’re not from the US or Mexico, these buggers may be a little hard to find (hint: try Google!), but they’re well worth it for the hot, deep, smoky flavors. They’re literally one of my favorite things ever. Adobo sauce not so much, though, so I prefer dried Chipotles.
- Habañero: These are some pretty, scorching little devils from the Caribbean that used to rank amongst the world’s hottest chilies not too long ago. They will burn your face clean off if you’re not careful, so I go easy on them. One for an entire pot is probably more than enough. I do, however, like them, especially when roasted, for their fruity bite and floral aromas. And luckily when we’re talking super hot chilies, a little goes a long way in terms of adding flavor as well as heat. Do use Habañeros in your Chili, but please, be careful!
What? No Ghost Chili? Loyal readers will probably remember my love for the Ghost Chili. But, rather sadly, Chili Con Carne is one application where I find the thing to be just too damn hot and exotic, so I steer clear of it. Desperate for Ghost Chili applications? Look here!
Pork fat makes all the difference: Remember how historically suet was an ingredient in Chili Con Carne? I’m not sure I quite agree with the original preparation, but I do believe fat to be a great carrier of flavor and while my Chili Con Carne is made primarily with beef, I always add a little pork fat. This can be done in one of two ways: Either by using rendered pork fat for frying the ingredients, a highly traditional, slightly messy and surprisingly smelly option. Or, preferably, by getting hold of the spice of life (i.e. bacon) frying it up to render out the fat, discarding whatever is not needed and using the rest for sautéing your aromatic vegetables. The choice is yours, unless of course you’re one of my muslim readers in which case you may consider going old school and substituting beef fat.
Where there’s smoke, there’s chili: Chili was originally a campfire dish and I like to pay tribute to that fact with a bit of smoky notes in my chili. And by a bit, I mean heavy. Smoky flavors can be added in quite a number of ways: smoked paprika, chipotle chili or Mezcal (see below) – even liquid smoke. I usually use all, except the latter, and have even gone to the lengths of slowly smoking my meat over a smoldering fire for maximum smoke infusion, but that’s another post. The bottom line is, a bit of smoke does a chili good.
A bottle of beer also does a Chili good: Or, half a bottle of beer, I should say. Adding a bit of beer to your cooking liquid is a trick favored by many Chili cooks, and one that you should pick up as well. You can technically use any kind you like, and many use plain middle of the road lager type beers. Which I find a little odd and flavorless. I usually use a dark ale or a stout type of beer, something with a bit of sweetness, character and roasted notes to it. For extra body and character, of course. Why only half a beer? Simple, you need something to sip on while the pot is simmering, right?

You COULD use a lager beer for your Chili Con Carne, but why would you?
… As does a shot of booze: And no, we’re not trying to get drunk here, but I have noticed that a shot of booze added during cooking will impart a certain, subtle, unique character to the dish. Especially if it’s a Mexican shot of booze to match the Tex-Mex theme of the dish. You could use tequila for an Agave-like kick, but better yet consider its slightly less famous cousin Mezcal made from roasted and/or burned leaves from an agave-like plant which provides a much more characteristic and powerfully smoky flavor. This step is entirely optional, especially if you’re into abstinence, but every little bit of flavor and character helps.
Coffee, and chocolate, all vices officially represented: You probably wouldn’t think so, but chocolate and chili are extremely great friends! Even a small bit of dark chocolate lends a subtle roundness and incredible depth to savory chili-based dishes. For this very reason, chocolate has been a vital ingredient in the Mexican chili sauce Mole Poblano for centuries and for this very reason, it’s a vital part of my Chili Con Carne as well. Coffee? Well, I include a shot of coffee for much the same reason: it just compliments everything so well. After a lengthy cooking session, you won’t actually taste the coffee in the finished Chili Con Carne, but it’s burnt and bitter notes mellow out and help create a nice depth and complexity in the final dish. Could you do without coffee and chocolate? Surely, but I always have dark chocolate laying around and since I always start my chili in the morning, I see no reason not to add that final splash of coffee to the pot rather than into my already jolted self. Every last little flavor molecule helps here.
… And don’t forget the beans, a surprisingly controversial topic
While the secrets and tips above may have caused some head turning amongst purists and raised a few brows, the headshaking they may have spurred is nothing compared to the age-old controversy/rivalry of chili making: Should chili be made with or without beans?
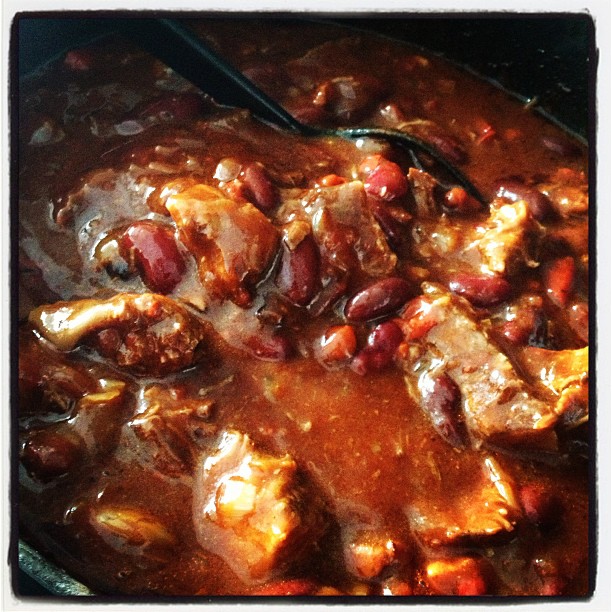
Beans or no beans? A matter of surprising controversy!
The debate, surprisingly enough, has been raging for well over a century. And a surprising amount of purists, former US President Lyndon B Johnson included, will offer you a resounding “NO! Chili is a no-bean dish!” – other aficionados, on the other hand, will tell you that a Chili simply is not a Chili without the addition of beans, usually of the small, red variety. It truly and honestly almost borders on a religious conflict.
Why the issue of beans in Chili has become such a dispute, I’m really not sure. Maybe it is because the original Chili was made without beans and only in later versions did the beans become prominent. It may well be an old school vs new school kind of thing, purists versus culinary rebels. Those kind of things are pretty common in the culinary world. Really, I’ve no idea, but the exchanges in the debate are heated and fun to follow.
Banned! As per decree from the Chili Appreciation Society International, beans have been a forbidden ingredient in competitive chili cooking since 1999.
My view on beans in chili? Traditional or not, I like them! Bring them on! I love a good amount of beans in my chili and, strangely enough, even my friends who supposedly don’t like beans have come to expect and enjoy them. What kind? I like red kidney beans. Dried or canned? Doesn’t matter. I’ve used both and haven’t been able to tell much of a difference to be honest. Quite frankly, I can be surprisingly lazy on the subject of beans and will usually reach for the canned variety. I know a good little organic brand that comes packed with chili, cumin and a few other spices. If you can find something similar, reach for it. It adds a nice little touch of it’s own.
Alright, let’s cook!
Yes, let’s! We’ve been over the history, we’ve covered the basics, tips, tricks and secrets have been passed on, and we’ve even covered the controversy that is beans in Chili. Now, then, let’s finally get around to cooking some Chili. Before we do, though, I should warn you that you will need about a day to complete this journey towards Chili nirvana. Nothing short of 7 hours of your time will do, I’m afraid. And if you at all can, it would be better to prepare your Chili a day ahead and allow it one day in the fridge for the flavors to really mingle and get acquainted. Your guests, and your own stomach, will thank you!
Chili Con Carne!
Still up for the challenge? Wonderful! Hey, Ho, Let’s Go!

Chili Con Carne
Ingredients
For chili beef
- 1.5 kilos bone-in chuck roast or other tough cut of meat
- 1 large carrot cut in chunks
- 2 large shallots halved
- 4 garlic cloves pealed but left whole
- 1 celery stalk
- 2 bay leaves
- 2 star anise pods
- 1 small cinnamon stick about three inches long
- 250 milliliters of dark beer
- 100 milliliters of good strong coffee
- a shot of Mezcal or Tequila
Spices (all are to taste)
- salt
- pepper
- a pinch of dried coriander
- 1 teaspoon dried oregano
- 1 teaspoon dried cumin
- 1 teaspoon hot, smoked paprika
- 1 tablespoon dried chipotle chili
- 2 tablespoons dried ancho chili
Aromatic vegetables
- 1 large onion finely diced
- 1 large onion cut into slivers
- 1 One large carrot finely diced
- 2 stalks Celery finely diced
- 1 garlic clove chopped
- 1 red, bell pepper finely diced
- 2 Jalapeño chilies seeded and finely diced
- 1/2 Habañero chili finely diced (optional)
Canned goods:
- 2 cans chopped or crushed tomatoes drained
- 2 cans "Chili beans"
- 100 grams concentrated tomato paste
Other:
- 150 grams of good quality bacon
- 150 milliliters flavorful beef stock
- 25 grams Quality dark chocolate 70% Cocoa
- 1 dash Fish sauce
Instructions
At the beginning of the day:
-
Sprinkle meat generously with salt and pepper on both sides.
-
Fetch a cast iron pot large enough to fit beef, warm it for a few minutes over high heat, add a splash of cooking oil and brown meat thoroughly on all surfaces.
-
Turn down heat to medium, remove meat, add carrots, shallots, whole garlic cloves, celery, bay leaves, star anise and cinnamon stick. Dump meat in on top and sprinkle with all the spices.
-
Add a splash of your morning coffee and 200 milliliters of good, dark beer and a shot of Mezcal. Put on lid and bring pot to a simmer.
-
Once simmering turn off the burner and place entire pot in a 110C degree oven for at least 4 hours
Four hours in:
-
Put a sauté pan or similar over medium heat, add in bacon bits and cook until bits are brown and all fat has rendered out.
-
Turn heat down to low, remove a bit of excess fat if necessary and add diced carrots, diced celery, diced onions, diced bell peppers, Jalapeño, Habañero, and chopped garlic. Stir to combine.
-
Cook vegetables over low heat for at least an hour, they shouldn’t sizzle or brown, but rather soften and sweeten. If you hear sizzling, turn down the heat.
Four and a half hours in:
-
Bring a second pan up to medium heat on the stove. Once hot add the large onion in slivers and a big pinch of salt.
-
Cook stirring somewhat frequently till onions have thoroughly and evenly caramelized, about 30 minutes.
-
Dump in tomato paste and continue to cook for a few minutes, stirring frequently.
-
Dump onions and tomato mixture into the pan of sweating vegetables then deglaze the pan with a bit of beef stock to loosen any burned bits and get every bit of flavor out of the pan, dump the stock into the vegetables as well.
Five hours in:
-
Evacuate your cast iron pot from the oven.
-
Remove meat to cutting board and strain all liquid into your pot of veggies, discarding bay leaf, star anise, cinnamon stick, and the spent veggies.
-
Put cast iron pot on medium-low heat on a burner, and commence to chop your meat into small, bite-sized pieces, discarding any bone, fat and remaining connective tissue you run into.
-
Dump the bite-sized meat back in the cast iron pot along with your now very fragrant aromatic vegetables from the sauté pan, drained tomatoes, a few drops of fish sauce, another splash of beer, beans and a small piece of dark chocolate.
-
Stir thoroughly but gently to combine and bring everything to a simmer, then back down heat if needed to maintain a slow simmer.
-
Add lid and simmer for about an hour.
-
After an hour, remove lid and taste for seasoning: If it’s not hot enough, add more chili, if it’s a bit too hot, add a bit more chocolate for more roundness, or possibly a pinch of sugar. For more earthiness try a bit more cumin or oregano. This is where you’ll shine as a cook.
-
Give everything one last stir and serve over rice with a dollop of sour cream, a sprig of fresh cilantro and a side of tortilla or tortilla chips and a cool Corona with a wedge of lime.
Seven hours to make Chili, are you kidding me?
Is this much time and effort really necessary? Well, for starters we need a good bit of time for the beef to loosen up and get tender and succulent. Secondly, we’re playing with a lot of complex, pungent and wonderful flavors here, flavors that need time to give us their all and come together in perfect harmony and create that deep, pungent, spicy, exotic and lengthy flavor we’re after. Many things can be faked and approximated, but there’s only one true way you’re going to get that perfectly complex authentic Chili flavor – and that, my friends, is through time.
Oh, don’t get me wrong, a perfectly acceptable Chili can be made in less than a day. But if you want perfection, you’re going to have to work for it! I’ve tried many a Chili Con Carne over the years and I’ve cooked up many a Chili Con Carne over the years as well. Some have been great, some have been not so great, some have been truly memorable! And out of those truly memorable ones, the best have been slow cooked with obsessive attention to detail. I say a slow cooked Chili Con Carne is worth every minute of the time put into it. How will you know? Try an honest to God, slow-cooked Chili just once and I’ll guarantee you’ll love it! Go on, I dare you!
Have a favorite kind of Chili Con Carne or a new, crazy and/or secret Chili Con Carne trick? Be sure to let your fellow readers know in the comments! 🙂
Missing start time for the two last steps!
Torkil, you’re absolutely right! Thanks for pointing that out. I’m guessing the blog software ate the numbers, err, or something to that extend…
Anyway, again, thank you! Approximate start time for the last steps has now been added 🙂
Now this is a serious chilli con carne. I love your addition of coffee and chocolate. What a brilliantly written story. Now I know why my version is a bit flat and lacking the overall depth your recipe will create. Consider this copied and to be cooked on Saturday 😀
Wow, thank you 🙂 I’m honored you’ll give the process a go. I hope the results will be everything you hoped for. The coffee and chocolate really adds a lot!
If you do wind up with a flat result, consider adding a few more drops of fish sauce, a little more hot sauce and some stock, possibly a little more herbs and spices, then letting it simmer for a few more minutes and taste again, that should do it.
Also, make enough so that you have leftovers on Sunday, it’s even better the next day 🙂
thanks so much for this great recipe! I really enjoyed the whole cooking process and, in fact, it’s opened up my eyes to using brisket or chuck instead of mince. The end result was absolutely delicious. As a result of cooking this, I spoke to a friend of mine who, it turns out, is a chill aficionado like yourself. He’s subsequently lent me a brilliant book all about chilli and we’ve started quite a hearty debate about what is the ‘real authentic’ chilli recipe. I think its going to be a long debate !
thank you once again for the lovely recipe and taking the time to share it with us.
Hi Ed, thank you so much for your kind feedback and taking the time to comment. I’m glad you enjoyed my rambles, suggestions and procedure – and even more thrilled that the results were delicions. A good chili is a thing worth fighting for 🙂
Have fun debating. I, too, think it will be a lengthy one. I’d be interested to hear the final results, if any 😉
just a question, your ingredients indicate canned tomatoes and one onion diced and one onion sliced…then the instructions say two onions sliced and tomato paste…so ??
Hello, David. Thanks for getting in touch and pointing out a few minor flaws in the recipe. I’ve upgraded the ingredients list to include the tomato paste mentioned in the procedure and I’ve also made the instructions call for the same amount of onion as the ingredients list.
Apologies for the confusion, thanks again and happy cooking! 🙂
Pingback: Om forberedelser inden fødslen og fastelavnsboller | Hjernesalat fra en førstegangsmor
Pingback: Danmarks bedste Festivalburger: Bizar burger rockede Copenhell | | Gastromand.dk
Hey there, this is the fourth time I am following this recipe and I think I’ve got everything down pat now – the final result is full of wonderful earthy flavours, the ingredients blend well together but can still be tasted separately. Definitely the best chili I’ve ever eaten! (But that’s coming from a French guy, chili is not too big around here…) Here are a few notes and suggestions I tried and tested over my attempts so far: 1) Chopped fennel makes a choice addition to the aromatic vegetables for a more aniseed taste. 2) I find the quality of the bacon quintessential if you want to get the smoky flavour right from the beginning. This is in my opinion the one ingredient in this recipe where you cannot compromise on quality. 2) I initially thought Imperial Stout would be the beer type of choice for this recipe, but I got the best results with Alaskan Smoked Porter and Anderson Valley Bourbon Barrel Stout. What beers do you use? 3) I think the step with the onion slivers is a bit underwhelming as it is. I like to add balsamic vinegar and honey (or alternatively, bourbon-infused dark sugar) and have them slowly and thoroughly caramelize in that. 4) Try a hefty dollop of tamarind paste during the final simmer if you need to sweeten things up a notch. Thanks a million for this recipe!
Philippe, so sorry about the late reply to your very thoughtful input! For whatever reason, your thorough musings got flagged as spam and were consequently hidden, I just found you in my spam queue, I’m terribly sorry about that.
Any way, on to your comment. Wow, four times? I’m equal parts happy and amazed, so happy that you’ve found this recipe and made it your own, that’s how I always imagined this space, as a source of inspiration to further ones own experiments. Now, for your notes and suggestsions:
1) I never though of fennel seeds, but I’m sure you’re absolutely correct, I may attempt that in a future version. 2) I agree whole-heartedly! You may or may not know that Denmark is actually one of the world’s leading bacon exporters, meaning that for years and years, we exported the good stuff and kept the leftovers to ourselves. What a revelation it has been to discover various types of gourmet bacon over the past couple of years. 3) I agree and disagree. I find that a slow, natural caramelization in their own sugars produce a sweet, aromatic flavor that I absolutely, but you’re absolutely right that the addition of balsamic vinegar and/or honey certainly adds another layer of flavor and this is certainly not a bad idea. 4) Yet another idea I’ve never thought about, I’ll have to give it a go!
No, thank you, Sir, for making this recipe your own and offering the rest of us some very valuable observations! Merci beaucoup!
Well… I didn’t have any beer (my hubby drank the beer I had intended to use – oops!) and I forgot to add fish sauce… and still this was some of the best chili I’ve ever eaten – and I’m not French, I’m American! My tweaks on your recipe included using a large 7-bone roast (and consequently increasing the amounts of all the ingredients) and chiles de arbol & guajillo chilis ground with the ancho. I also waited until the roast was finished cooking, and added the chopped aromatics & chilis etc. to the pot the roast had cooked in – they beautifully deglazed the caramelized juices and I didn’t need to use another pan 😉
I started kind of late in the day, so I finished the chili in my slow cooker overnight. I thought coffee and bacon were my favorite smells to wake up to but this chili might have replaced them! Thank you for sharing this beautiful and well-researched recipe!
Thank YOU for this beautiful bit of input and update! I’m so incredibly pleased that you enjoyed the results of my guidelines and your own tweaks. Since finding a local source, I’ve started adding guajillo and chiles de arbol myself to the mix for extra depth and flavor, I must have forgotten to give this recipe the update it deserves.
Thanks again for chiming in and happy cooking!
Johan I must thank you . I have been making carne con chili based on your recipe since about 2015. I lived in London back then and could get all the different chilis. etc… Now I live far away and over the hills on a farm in Bulgaria so I have had to work with what I have. I have one suggestion that I think brings something to the dish and a couple of work-arounds that I use to approximate your excellent end result. 1. Beef here is expensive and pork belly excellent and very cheap. I mince the pork belly and add it to the slowly sweetening vegetables. I use about 70% / 30% beef to pork and find that the mince with the chunks lends an extra texture and level of flavour. 2. I use as many types of chili I can find and add them at different stages, both fresh and dried. 3. I am lucky to live in a region where romano red peppers grow better than bell peppers. They bring an extra sweetness.
Anyway, thanks again. It is an awesome recipe, because it is about the processes, not necessarily the ingredients. Salut!
Wow, Paul, I really appreciate the kind words and input. Thank you so much! As you say, it’s much more about the process and the journey than the ingredients and I’m beyond proud that you’ve taken my recipe and made it your own.
Pork belly sounds like a magnificent choice to stretch the beef, and I do imagine it adds a fair bit of flavor and texture on its own. Thank you so much for the input. I feel inspired to try that one day! 🙂